Instruction
Immunohistochemistry (IHC) is a common immunostaining application dependent on specific antigen-antibody binding in tissues. IHC uses a fluorescent color labeled secondary antibody to detect the primary antibody. Proper sample preparation is crucial in order to maintain cell and tissue structure, as well as antigenicity of target epitopes. Tissues may be sliced or used whole, and can also be embedded in a medium like paraffin. For paraffin fixed tissues, the sample must be dewaxed and hydrated. Endogenous peroxidase and biotin should be removed to reduce interference. Antigen repair is also performed to reveal epitopes, followed by blocking and antibody incubation.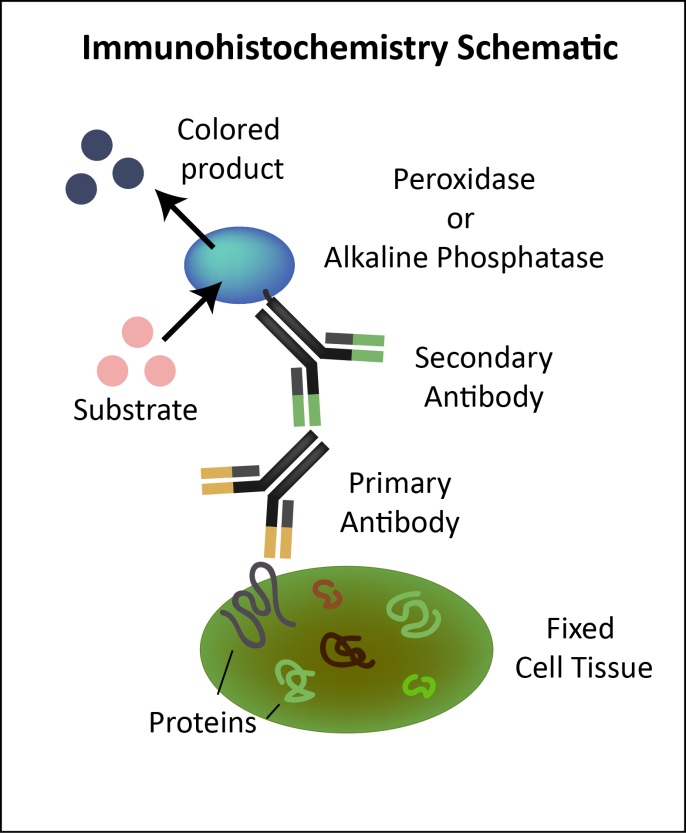 IHC diagram courtesy of Geneticist. Click to enlarge.
| 2%APES- acetone (makes 300ml) | |
| APES | 6ml |
| Acetone | 300ml |
| Mix solution. | |
| 25×PBS (makes 5000ml) | |
| KCl | 25g |
| Na2HPO4 2H2O | 180g |
| KH2PO4 | 55g |
| NaOH | 7g |
| NaCl | 1000g |
| Fully dissolve the compounds. Then add water for a total volume of 5000ml. | |
| PBST (makes 1000ml) | |
| 1×PBS | 1000ml |
| Tween-20 | 5μl |
| Mix solution. | |
| Citric acid sodium citrate buffer (makes 500ml) | |
| Trisodium citrate dihydrate | 14.7g |
| Fully dissolve in 500ml ddH2O | |
| Citric acid monohydrate | 4.2g |
| Fully dissolve in 200ml ddH2O | |
| Add 90ml citric acid monohydrate solution into 410ml trisodium citrate dihydrate solution and mix. | |
Dewaxing and hydration
Clear paraffin so that tissue is exposed and re-hydrate.- Remove wax by soaking sample in xylene (or another detergent) at least for 60 min.
- Place staining rack sequentially in different concentrations of alcohol including; 100% 2x, 95%, 85%, 75%, 60%. Leave staining rack in each alcohol solution for 5 min.
- Permeate cell membrane by using 0.3% TritonX-100 for 5 min.
- To reduce background, keep the sections moist at all times
- Because xylene is toxic, other dewaxing agents can be considered.
- Heating the section may aid in dewaxing.
- Soak the slice in 2% APES- acetone buffer for 1 min to prevent stripping of tissue, then heat the slice at 60℃ for 15min.
- The duration of the dewaxing process may vary depending on temperature and reagents. To improve results, extend the time and keep fresh reagents accessible.
Removal of endogenous enzyme interference and antigen repair
During the fixing process, formaldehyde can block the epitope by cross-linking the target antigen in the tissue. To prevent this, an antigen retrieval step may be needed before staining in order to expose antigenic sites. Buffers that may aid in epitope retrieval include; citrate buffer (pH 6.0), EDTA buffer (pH 8.0), and TE buffer (pH 9.0). Typically, buffer with higher pH provides stronger repair. Endogenous peroxidase should also be removed because it can react with DAB and the Biotin labeled secondary antibody, which can result in a false positive. To remove the endogenous enzyme, 3% H2O2 can be prepared with ddH2O, PBS, TBS or methanol.
- Use 3% H2O2 to remove endogenous enzyme for 5min.
- Soak slices in PBS pH 7.4.
- Prepare 500ml of citric acid sodium citrate buffer in a 1L beaker, and place it in a pressure cooker. Heat the buffer in the water bath to 100℃. Then place the staining rack in the boiled buffer. Seal the beaker mouth with plastic wrap to prevent any water vapor from entering the buffer during heating. Continue heat the cooker with 1000W power to a high pressure state and keep for 2min. Stop the heat after 2 min.
- Wait until the pressure cooker cools. Take out the beaker and let cool to RT.
- Wash the slices with PBS 3 times for 5 min each.
Blocking
The process is to block the nonspecific binding of antibodies with the serum which is from the same source of secondary antibody. Enclose tissues using 10% non-immunized goat serum, 100ul for each piece of tissue; place the slice in wet box for 30 min at room temp.
Antibody incubation
Be sure to use a validated primary antibody. Determine the dilution ratio and incubation time of antibody beforehand. To better ensure successful antibody-antigen binding, we recommend a low temperature and a long incubation time.
- Remove remaining blocking buffer.
- Dilute antibody to a proper concentration and add to the tissues to incubate overnight at 4℃. We recommend 0.01μg/ml as a working concentration.
- Wash the slices in PBST 3 times for 5 min each.
- According to instructions, dilute the second antibody to working concentration and incubate for 1 hour at 37℃. We choose the Biotin-labeled antibody as a second antibody.
- Wash the slices in PBST 3 times for 5 min each.
- According to instructions, dilute the third antibody to working concentration and incubate for 1 hour at 37℃.
- Wash the slices in PBST 3 times for 5 min each.
- Determine optimal antibody incubation concentration beforehand by setting a gradient dilution.
- To ensure full binding between antigen-antibody, we recommend a long incubation period at a low temperature.
- Slices must be washed gently and clean.
Staining
There are a few different detection systems in the staining process: one-step, two-step, and three-step. In the one-step staining method, a labeled antibody reacts directly with the substrate. In the two-step method, the target protein is stained reacting with a labeled secondary antibody. The three-step method involves the labeling of a third antibody (can be HRP, AP or Biotin) to enhance detection signal. We recommend using DAB as a staining agent. The following procedure is for the three-step method, in which the secondary antibody is Biotin labeled, and the third antibody is HRP labeled. The nucleus is stained with hematoxylin.
- Wash the slices in PBS 2 times for 5 min each.
- Prepare and filter fresh DAB.
- Add DAB to the tissues and monitor immediately under a microscope.
- When the tissue is stained, wash the slices in the PBS.
- Stain the nucleus with hematoxylin and view cell structure
- Filter DAB and hematoxylin before use.
- Add fresh H2O2 to the DAB before use.
- Closely monitor the termination color time by observing the reaction between label groups and substrate under a microscope. The time should not exceed 10 min.
Detection
- Heat the slices at 60℃ to dry up, and then add proper neutral balsam to seal the tissue
- Observe the staining under the microscope and take photos with the right field of view.


 Cart (0)


